
JPOSNA® Special Edition
Advances in Pediatric Orthopaedic Education and Technical Training
Preoperative Planning for Your Career
1Atrium Health Musculoskeletal Institute, Charlotte, NC; 2OrthoCarolina, Charlotte, NC
Correspondence: Brian P. Scannell, MD, OrthoCarolina, 2001 Vail Ave., Charlotte, NC. E-mail: [email protected]
Received: April 19, 2022; Accepted: April 19, 2022; Published: August 15, 2022
DOI: 10.55275/JPOSNA-2022-0054
Volume 4, Number S1, August 2022
Abstract:
Surgical residents face significant demands to obtain the requisite skills and knowledge for their specialty by the time they graduate. Structured, guided, deliberate learning in a manner that is reproducible is crucial for surgical resident success and for ensuring residents will be able to meet the increasing demands of clinical practice. Use of an organized surgical planning tool, such as the PERFECT (Position, Exposure, Reduction, Fixation, Evaluation, Closure/Contingency, and Therapy) model described in this article, is fundamental and indispensable to not only resident education, but to one’s future career and to orthopaedic practice more broadly. This tool helps to emphasize important elements of a case, allows for mental rehearsal, serves as a custom educational resource for the resident, provides a framework for focused and intentional communication between the resident and attending surgeon, helps to encourage a critical appraisal of a procedure by all participants, and provides the resident guidance for future practice. Broadly instituting teaching frameworks such as the PERFECT model has demonstrated the potential to improve the standardization and overall learning experience for orthopaedic surgical residents, who continue to be tasked with learning more efficiently in a changing healthcare and education landscape.
Key Concepts:
- Current surgical resident education practices often involve self-guided, unstructured, pure discovery learning, which has been shown to be ineffective and inefficient.
- Structured, guided, deliberate learning is crucial for resident success.
- The PERFECT (Position, Exposure, Reduction, Fixation, Evaluation, Closure/Contingency, and Therapy) surgical planning tool provides a paradigm by which residents can organize their preparation efforts for a case in a systematic manner that leads to reproducible results and sets them up for success in their careers.
Introduction
Background of Modern Surgical Education
A century and a half has passed since Halstedian “surgical preceptorship” was first introduced, whereby trainees gain graduated autonomy in patient care under the close supervision of senior attending surgeons.1,2 However, this model does not provide a specific framework with regards to the practical aspects of resident learning. Indeed, there exists significant heterogeneity in how surgical residents acquire surgical skills and knowledge, and current practices often involve self-guided, unstructured, pure discovery learning.3,4 This haphazard “learn-by-doing” approach has been shown to be ineffective and inefficient.3 Further, surgical education today faces additional challenges and pressures that may compromise the quality of a resident’s training experience. For example, modern duty hour restrictions lead to less operative time for residents.3–6 Any degree of compromise to surgical education, and particularly operative volume, may leave some residents feeling unprepared for performing certain procedures upon graduation.5 Finally, there is an ever-increasing volume, variety, and complexity of cases as new surgeons enter independent practice.5 Most assuredly, structured, guided, deliberate learning is crucial for resident success.
One area that is fundamental to orthopaedic practice and lends itself well to structured, guided, deliberate learning is operative planning.3,7 Ironically, operative planning is often not routinely discussed between residents and attendings, and therefore provides a significant opportunity for improving surgical education.3 Notably, the majority of available literature on surgical education tends to focus on topics such as assessment and feedback as well as evaluation of performance, mentorship, and leadership.3–6,8,9 With regards to orthopaedic surgery specifically, the limited available literature tends to focus almost exclusively on fixation planning, leaving many other aspects of operative planning still unguided.7 In addition, the American Board of Orthopaedic Surgery Knowledge, Skills, and Behavior Program will now be tracking resident assessments from attendings for—among other skills—proficiency with developing a surgical plan. To this end, we present in this article a simple, easily implementable surgical planning tool that residents at our institution are taught from the very beginning of their training.
Body
Development of a Surgical Planning Model
The PERFECT (Position, Exposure, Reduction, Fixation, Evaluation, Closure/Contingency, and Therapy) surgical planning tool was developed based on identifying broad aspects deemed to be the most fundamental to a case. Frequently referred to colloquially as a “preoperative plan,” the term “surgical plan” is perhaps more appropriate, as this model encompasses not just preoperative, but also intraoperative and postoperative planning, learning, and feedback. Although this tool was originally developed for fracture care, it can be applied to virtually any case by simply modifying or omitting certain sections as appropriate. This tool provides a paradigm by which residents can organize their preparation efforts for a case in a systematic manner that leads to reproducible results and sets them up for success in their careers.
This tool provides six key benefits:
- Helps to emphasize elements of a case that often are underappreciated, if even considered at all, by inexperienced trainees
- Allows for mental rehearsal, which is known to improve human performance10–15
- Serves as a custom-tailored educational resource for each procedure, which is developed and further refined over the course of the resident’s career
- Provides a framework for formal, efficient, intentional educational communication that deliberately focuses the learner and instructor, guides teaching, sets learning and performance objectives, builds autonomy, and minimizes excessive participant burden
- Provides a more objective and actionable rubric for feedback after a case, helping to encourage a critical appraisal of the procedure by participants, and maximize knowledge and insight into performance on the part of the learner
- Provides the learner guidance for future practice3
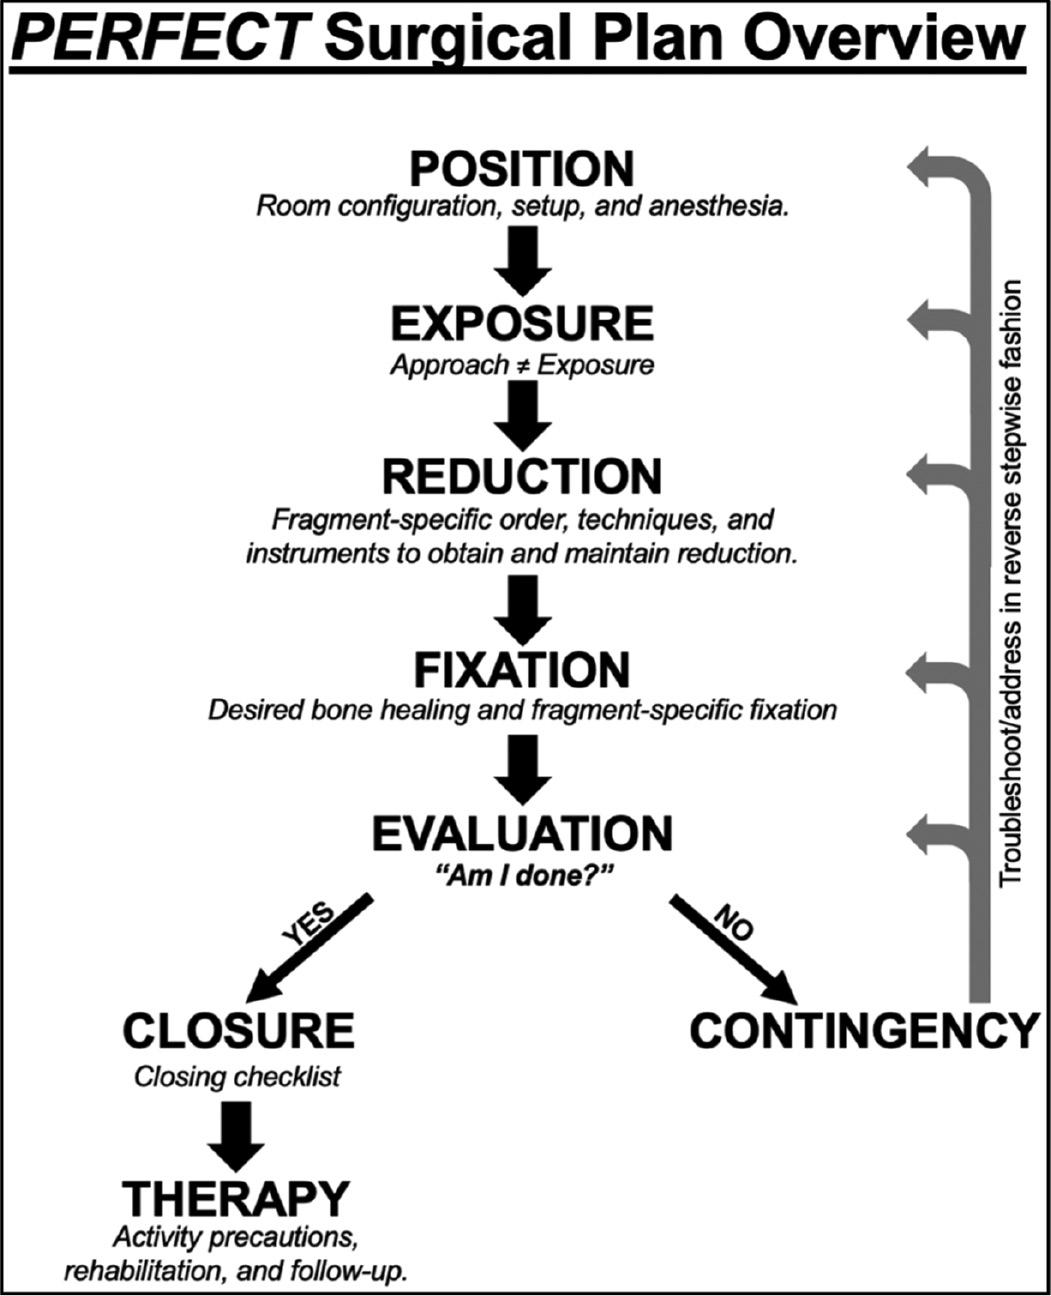
Each section in the PERFECT surgical plan is described in detail below. A sample case is included in Appendix A. Note that the sample case reflects intern-level preparation for an actual case and lacks certain higher-level details, such as contingency plans; this case is included purely to illustrate the PERFECT plan and highlight how a young resident with minimal to no experience performing this case may approach preparation and debriefing. A flowsheet-style pocket reference overview of the model is included in Figure 1.
Figure 1. Pocket reference overview of the PERFECT surgical plan, with memory cues to highlight the most critical information in each section.
Position
This section includes items related to the planned room configuration, setup, and anesthesia; a list of key items to include in this section of the surgical plan is shown in Table 1. Consideration should also be given to the specific advantages and disadvantages of different positioning options (and whether a change in position may be necessary during the case), operating table(s), and other items that will be important in appropriately positioning the patient and visualizing the operative field (e.g., bumps, foam wedge/block, radiolucent triangles, etc.).
Table 1. Key considerations for the Position section, including planning room configuration, setup, and anesthesia
|
Exposure
This section includes details pertaining to the specific approach and exposure—two concepts that are important for residents to distinguish between. Approach involves developing the interval(s) and/or tissue plane(s) to get from the skin down to the level of where work will be performed. Exposure is what is required to visualize whatever is necessary for a given procedure (e.g., to achieve and assess the reduction). Exposure requires considerable forethought to anticipate the tools (e.g., beach chair positioner, etc.), techniques (e.g., patient positioning, limb manipulation, retractor placement, proper involvement of assistant(s), etc.), and other special details needed to optimize visualization. Depending on the specific patient, case, and exposure, consideration should also be given to estimated blood loss (e.g., blood salvage, local and/or systemic hemostatic agents, electrocautery, etc.).
Reduction
This section includes details pertaining to the fragment-specific reduction plan, including the techniques and instruments that will be used to obtain and maintain reduction. A list of key considerations for this section of the surgical plan is shown in Table 2.
Table 2. Key considerations for the Reduction section, including the techniques and instruments that will be used to obtain and maintain reduction
|
Fixation
Once the reduction is planned, focus then shifts to determining the desired type of bone healing that will be targeted (e.g., primary, secondary) and developing a fragment-specific fixation plan. A number of construct-related details are planned at this point, which are listed in Table 3.
Table 3. Key considerations for the Fixation section, based on the desired type of bone healing, stability, obviation of construct failure, implants, and optimal application principles
|
Evaluation
For young and experienced surgeons alike, assessing ones’ work and answering the question of “Am I done?” is always the most difficult part of any case. This step in the PERFECT plan determines whether the case is “done” (the surgeon then moves on to Closure) or whether the case is “not done” (the surgeon then moves on to Contingency; see section below and Figure 1); in some cases, either due to the nature of the case or to troubleshoot issues that are encountered, this step may be quite tedious and iterative. A list of key considerations for this section of the surgical plan is shown in Table 4.
Table 4. Key considerations for the Evaluation section, all of which contribute towards answering the question “Am I Done?”
|
Closure/Contingency
This section includes a myriad of details regarding contingency plans for potential complications, closure of the patient’s surgical wound(s), and plans for the immediate postoperative period. The contingency plan is largely based on the evaluation of the reduction and fixation as well as any other complications that may require operative intervention prior to closure. The contingency plan should be “balanced”: The surgeon’s knowledge, experience, and planning must be able to reasonably anticipate complications so that the appropriate techniques, instruments, and/or implants are at the ready (the surgeon’s so-called “tool chest” or “tricks” for getting out of difficult surgical situations), while not making the continency plan more burdensome than necessary. With regards to the reduction and fixation, the contingency plan involves back-tracking in a stepwise fashion (e.g., Fixation, Reduction, Exposure, Position) to determine where the issue likely originated and thus involves a spectrum of potential remedies—from augmentation of or a simple change in fixation, to adjustment of the reduction, to a more extensile exposure or even a different exposure, and in particularly challenging situations, even repositioning of the patient (see Figure 1).
A “closing checklist” was developed that systematically covers wound closure and dressings, critical aspects of the case that may be important to communicate during patient hand-offs, and other key aspects of the patient’s immediate postoperative care (Table 5). It is worthwhile to note that the nomenclature “closing checklist” is not simply referring to a list of items for closing the patient’s surgical wound (although that is part of the checklist), but rather is meant to be a comprehensive checklist the operating surgeon runs through while closing the wound to ensure that all relevant items are addressed. Using this checklist in conjunction with direct resident-to-attending communication at the end of a case inevitably fosters trust and communication between the learner and instructor and undoubtedly leads to a more complete understanding of the case for the learner.
Table 5. A proposed closing checklist for the learner to go through with the instructor while closing the wound to ensure that all relevant items are addressed.
|
Therapy
This section includes details regarding the patient’s activity level/restrictions (e.g., weight bearing status, range of motion precautions, and/or other restrictions or precautions), physical rehabilitation following surgery (e.g., formal physical and/or occupational therapy, etc.), and postoperative follow-up plan.
Postoperative Debriefing
One of the most important and beneficial aspects of any surgery is debriefing between the learner and instructor at the conclusion. In this section, the resident can keep a running log of similar cases that utilize the same/similar surgical plan. Upon completion of residency training, the resident then has not only an organized, personalized, detailed, comprehensive surgical plan for the case, but also records of previous cases that are readily accessible and reviewable. A list of proposed items to include in this section of the surgical plan is shown in Table 6.
Table 6. Proposed list of key case summary items for the learner to include in the Postoperative Debriefing section. Upon completion of residency training, the surgeon will have compiled a readily accessible and reviewable series of similar cases. *To aid in identifying specific learning points from the case, the resident may choose to utilize previously described and validated models for debriefing, including the “Replay, Reconstruct, Reflect, Redirect” model adapted from the Federal Aviation Administration.9
|
In addition to teaching residents the PERFECT model, we also emphasize two other key behaviors at our institution that complement surgical planning: 1) Immediate, directed, verbal feedback from the instructor before, during, and after a case, mirroring the widely used Briefing, Intraoperative Teaching, and Debriefing (BID) teaching framework;3 2) Learner-driven postoperative reflection and surgical plan enhancement. The overarching goal, particularly for younger residents, is not to be able to fill out every single conceivable detail of the plan for every case. Instead, it is to begin to illuminate knowledge gaps and teach young residents to consider aspects of a case that may not always get verbalized by the instructor and would otherwise go unnoticed by the learner. Over time, as the resident gains more knowledge and experience, the expectation is that the plan will become more detailed and refined.
Keys to Successful Implementation of Surgical Planning Model into Clinical Rotations
- Early introduction. At our institution, the PERFECT surgical planning tool is introduced to orthopaedic residents at the very beginning of their training, as part of a previously described month-long, comprehensive orthopaedic intern surgical skills curriculum.16 We feel that doing so helps to immediately establish a culture where surgical planning is viewed as a natural, routine, and essential aspect of education, and therefore is generally expected for every case a resident participates in. As junior residents transition to senior residents, their experience with the planning tool naturally translates into more opportunities for peer teaching and mentorship, thereby having the added, indirect effect of developing leadership skills in the senior resident.
- Clear expectations. Surgical planning is first and foremost a tool that allows for consistent and objective learning in resident education. Nevertheless, different instructors will undoubtedly have different preferences when it comes to resident surgical plans. For this reason, the instructor should clearly and explicitly (not implicitly) state what the expectations are regarding surgical plans (e.g., a formal document, a slide presentation, an informal discussion before the case, etc.). The amount of time and formality that is expected by the instructor with regards to planning and preparation should also be realistic: The process should be structured enough to reinforce the essential aspects of the case and associated decision-making while not being overly burdensome time- or complexity-wise. To this end, one helpful strategy is for the instructor to guide the learner’s preparation by emphasizing areas of the surgical plan that are most critical and level appropriate. The instructor should be encouraged to take an active role in the surgical planning process with residents, which will also help to ensure efficient, effective, and sustained participation by the resident.
- Timely delivery. There is no substitute for a preoperative discussion between the learner and instructor. Therefore, if any deliverable (e.g., a formal document, a slide presentation, etc.) is expected by the instructor, it should be provided by the resident within a reasonable amount of time to allow the instructor to review and critique and for the learner and instructor to discuss. In certain instances, it is understood that it may not be feasible for the resident to anticipate attending assignment or cases ahead of time (e.g., trauma, call cases/add-ons, etc.). In these instances, there is still the opportunity, and expectation, for preoperative, intraoperative, and postoperative discussion and feedback.
- Instructor accessibility. The instructor needs to be available and accessible to the learner to directly discuss the procedure. Such discussions are the “gold standard” of surgical planning and should be viewed as mandatory for every case.4,5
- Evaluation and feedback. The PERFECT surgical plan helps the instructor to more precisely identify resident learning needs and provide more specific, actionable feedback—two behaviors deemed by residents to be the most meaningful in terms of excellent teaching.5 The postoperative debriefing aspect of surgical plan also facilitates discussions regarding performance evaluation and feedback.
Surgical Planning for Your Career
The educational benefits of structured, guided, deliberate surgical planning using the PERFECT model for trainees are clear. However, implementing surgical planning during residency training also sets the foundation to successfully provide and receive peer coaching and feedback down the road as an attending physician. One well-established, effective, and valuable peer-to-peer surgical coaching framework that has been described involves preoperative goal setting, intraoperative observation, and postoperative debriefing—mirroring the widely used BID-style teaching that underpins the PERFECT surgical plan.17,18 In this way, having extensive experience with this framework from residency training will almost certainly translate into new attendings being better able to adapt to their new, more advanced role in real-time. As a result, these young attendings will start off right away as more effective teachers, learners, partners, and peers, which will undoubtedly lead to improved surgical development throughout their careers.
It is worth mentioning that the technologies, resources, and abilities of surgical intervention and planning are rapidly expanding and advancing. The capabilities of virtual reality, augmented reality, and three-dimensional modeling are increasing the level of detail and preparation that can be performed preoperatively.19,20 As more of these tools are developed and incorporated into surgical practice, residents should likewise be ready, willing, able, and expected to incorporate these modalities into their surgical plans. As the practice of orthopaedic surgery continues to grow and evolve, the knowledge we afford—and expect from—our residents must follow suit.
Summary
Structured, guided, deliberate learning in a manner that is reproducible is crucial for resident success. Use of an organized surgical planning tool, such as the PERFECT model described in this article, is fundamental and indispensable not only to resident education, but to ones’ future career and to orthopaedic practice more broadly. This tool helps to emphasize important elements of a case, allows for mental rehearsal, serves as a custom educational resource for the resident, provides a framework for focused and intentional communication between the resident and attending surgeon, helps to encourage a critical appraisal of a procedure by all participants, and provides the resident guidance for future practice.
Disclaimer
No funding was received. M. Schallmo, R. Turk, B. Scannell: No conflicts of interest to disclose; J. Hsu: Stryker (consultant, speaker); Smith & Nephew (consultant, speaker); DePuy Synthes (speaker); Integra Lifesciences (speaker).
References
- Barnes RW, Lang NP, Whiteside MF. Halstedian technique revisited. Innovations in teaching surgical skills. Ann Surg. 1989;210(1):118-21.
- Frick SL. Who gets the knife? Pediatric Orthopaedic Society of North America’s Resident Review. 2013 September 2013.
- Roberts NK, Williams RG, Kim MJ, et al. The briefing, intraoperative teaching, debriefing model for teaching in the operating room. J Am Coll Surg. 2009;208(2):299–303. Epub 20081204.
- Zhou NJ, Kamil RJ, Hillel AT, et al. The Role of Preoperative Briefing and Postoperative Debriefing in Surgical Education. J Surg Educ. 2021;78(4):1182-1188. Epub 20201127.
- Zhou NJ, Kamil RJ, Zhu J, et al. Preoperative briefings and postoperative debriefings to increase resident operative autonomy and performance. J Surg Educ. 2021;78(5):1450-1460. Epub 20210320.
- Francis DO, Eavey RD, Wright HV, et al. Incorporating postoperative debriefing into surgical education. J Surg Educ. 2016;73(3):448-452.
- Atesok K, Galos D, Jazrawi LM, et al. Preoperative planning in orthopaedic surgery. Current practice and evolving applications. Bull Hosp Jt Dis. (2013). 2015;73(4):257-268.
- George BC, Teitelbaum EN, Meyerson SL, et al. Reliability, validity, and feasibility of the Zwisch scale for the assessment of intraoperative performance. J Surg Educ. 2014;71(6):e90-e96. Epub 20140903.
- McGreevy JM, Otten TD. Briefing and debriefing in the operating room using fighter pilot crew resource management. J Am Coll Surg. 2007;205(1):169-76.
- Ahmad CS. SKILL: 40 Principles that Surgeons, Athletes, and Other Elite Performers use to Achieve Mastery. Lead Player LLC; 2015.
- Christensen L. Mental Rehearsal for Warriors: CreateSpace Independent Publishing Platform. 2014.
- Driskell JE, Copper C, Moran A. Does mental practice enhance performance? J Appl Psychol. 1994;79(4):481-492.
- Goleman D. Focus: The Hidden Driver of Excellence. Harper Paperbacks; 2015.
- Toth AJ, McNeill E, Hayes K, et al. Does mental practice still enhance performance? A 24 Year follow-up and meta-analytic replication and extension. Psychol Sport Exerc. 2020;48:101672.
- Ungerleider S, Bollettieri N. Mental Training for Peak Performance. Rodale Books; 2005.
- Ford SE, Patt JC, Scannell BP. A comprehensive, high-quality orthopedic intern surgical skills program. J Surg Educ. 2016;73(4):553-558. Epub 20160430.
- Pradarelli JC, Yule S, Panda N, et al. Optimizing the implementation of surgical coaching through feedback from practicing surgeons. JAMA Surg. 2021;156(1):42-49.
- Pradarelli JC, Yule S, Lipsitz SR, et al. Surgical Coaching for Operative Performance Enhancement (SCOPE): skill ratings and impact on surgeons’ practice. Surg Endosc. 2021;35(7):3829-3839. Epub 20200708.
- Vles MD, Terng NCO, Zijlstra K, et al. Virtual and augmented reality for preoperative planning in plastic surgical procedures: a systematic review. J Plast Reconstr Aesthet Surg. 2020;73(11):1951-1959.
- Cao C, Cerfolio RJ. Virtual or augmented reality to enhance surgical education and surgical planning. Thorac Surg Clin. 2019;29(3):329-337.
Appendix A
Antegrade ESIN/IMN (“Flex Nail”) of Pediatric Tibial Shaft Fracture
POSITION
Nursing, Anesthesia, and Room Setup Considerations
- Patient position and table: Supine, OSI-flat top, bump under ipsilateral hip (enough that knee points straight up to ceiling), ±radiolucent triangles (vs. stack of blue OR towels if patient too small for triangles, or if no reduction necessary)
- Side of room to setup: Ipsilateral
- C-arm and monitor position: From contralateral side
- Estimated procedure time: 90 minutes
- Anesthesia: GETA
- Antibiotics (including drug, dose, contingency for severe PCN or other beta lactam [e.g., cephalosporin] allergy, and redosing timeframe): Ancef
- Muscle relaxation/paralysis: Not routinely
- Perioperative pain management: Multimodal
- Goal-directed blood and fluid management:
- Anticipated EBL (e.g., <100 mL/simple, 100-1,000 mL/moderate complexity, >1 L/high complexity): Minimal, <25 cc
- Anticipated blood product transfusions, crystalloid/colloid infusions, and/or antifibrinolytics (e.g., tranexamic acid/TXA): None
- Hemodynamic monitoring (e.g., MAP goals, arterial line, central line, etc.):None
- Foley: Not routinely
- Tourniquet: Not routinely
- Prepping and draping: Map out prep area (above knee) with clear drapes, aseptic skin prep, sterile drapes
EXPOSURE AND REDUCTION
- See technique guide; additional modifications and points of emphasis as described below.
- Measure isthmus of canal on injury XR prior to case
- Historically, goal has been to have two nails fill up ≥80% of the canal (individual nail diameter ≥40% of IM canal diameter). However, deeper review of the literature has shown that this recommendation originated from a study involving flexible nailing of femur, tibia, and forearm fractures. Importantly, the forearm fractures were treated with a single flexible nail (in one or both bones). The study found fewer complications (e.g., nonunion, refracture, etc.) when ≥80% of the canal diameter was filled. This has been extrapolated over the years and now it is widely “accepted” as the goal. However, this number is largely inaccurate for femur fractures, which can have <80% of the canal diameter filled with the nail.
- Measure isthmus of canal on injury XR prior to case
- Perform provisional closed reduction of fracture (numerous ways this can be performed)
- Localize incision and insertion points fluoroscopically
- On AP fluoroscopy, place freer-elevator over proximal tibia to locate and mark medial and lateral incision points (see image below).
- Goal is to make start point lie within proximal metaphyseal flair, ~2 cm distal to proximal tibial physis.

- Goal is to make start point lie within proximal metaphyseal flair, ~2 cm distal to proximal tibial physis.
- On AP fluoroscopy, place freer-elevator over proximal tibia to locate and mark medial and lateral incision points (see image below).
- Approach:
- ~2-3 cm longitudinal incision along approximately the anterior 1/3 of the proximal tibia on lateral XR (see yellow line below). If you were to make the incision at the geometric midpoint of the proximal tibia in the sagittal plane, the posteriorly-flared shape of the proximal tibial metaphysis will cause you to end up too posterior in the diaphysis (see red line below).
- Medial incision: Incise directly over bone (will be near insertion of pes anserinus)
- Lateral incision: Incise through anterior compartment fascia
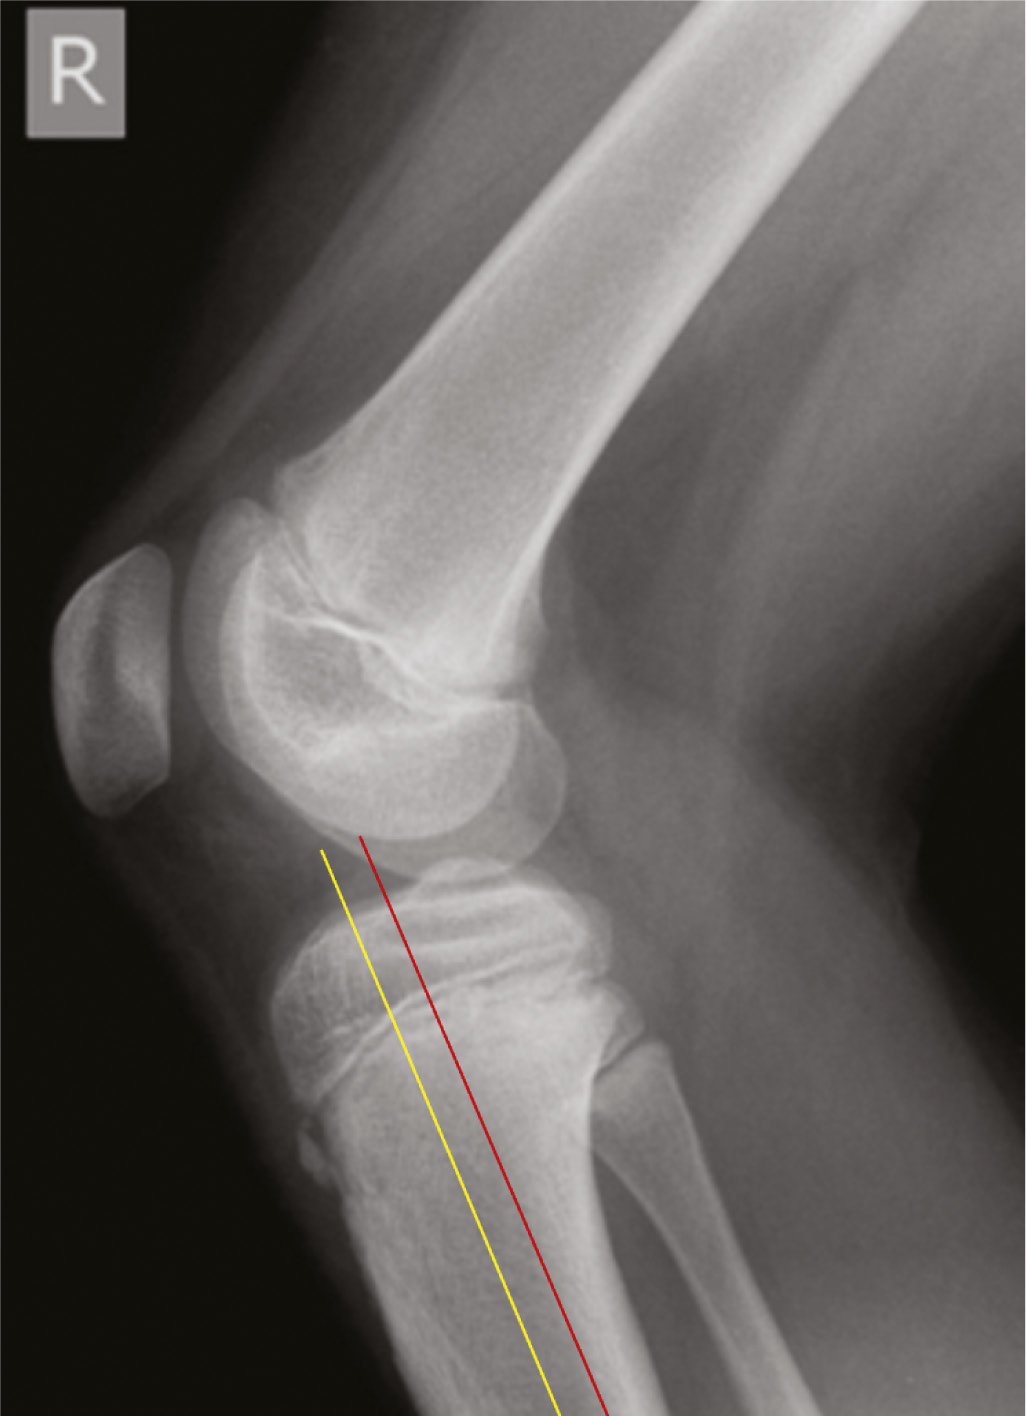
- ~2-3 cm longitudinal incision along approximately the anterior 1/3 of the proximal tibia on lateral XR (see yellow line below). If you were to make the incision at the geometric midpoint of the proximal tibia in the sagittal plane, the posteriorly-flared shape of the proximal tibial metaphysis will cause you to end up too posterior in the diaphysis (see red line below).
- Exposure:
- Gently dissect down to bone with Bovie and dissecting scissors
- Insert small Weitlaner/self-retainer
- Dissect in-line and perpendicular to tissue fibers when deepening dissection; dissect perpendicular and in the same plane of tissue fibers to further open a plane of tissue. Ensure fascia/periosteum incised and you are completely down on bone.
- Use caution to avoid damaging vital structures (should not be encountered if staying on bone and remaining in the anterior-posterior midpoint:
- Medial: Saphenous nerve, great saphenous vein (both should be posterior to exposure)
- Lateral: Common peroneal nerve (should be well posterior to exposure)
- Once on bone, provisionally place awl on bone and assess start point fluoroscopically (see above for ideal start points)
- Gently dissect down to bone with Bovie and dissecting scissors
- Create cortical opening for first nail
- Begin with awl straight perpendicular to cortex, again ensuring you are at approximately the anterior 1/3 of the proximal tibia in the sagittal plane.
- Advance through cortex
- Check AP to ensure appropriate, perpendicular trajectory (and, if creating cortical opening for second nail, that the awl is not interfering with the first nail)
- While still advancing, angle awl distally (bring hand proximally) while still in bone to create oblique entry hole.
FIXATION
- Insert first nail
- Prior to insertion, important to contour the rod appropriately. To do this, place a bend along the rod that roughly corresponds to the location of the fracture.
- Can be helpful to place the nail over the skin and obtain a fluoroscopic image to localize the fracture with the nail superimposed; makes it easier to see where exactly the nail should be bent.
- Insert nail with hook facing away from fracture; stop after nail advanced to just above fracture.
- Use inserter handle and, if necessary, mallet.
- Once rod has some purchase into the canal, rotate hook 180 degrees so that hook now facing towards fracture.
- Be mindful of skin as you insert nail—the nail itself and the collet of the inserter can both really dig into the patient’s skin as the nail is advanced. Take care to gently bend the nail outwards as you advance it, in order to prevent pressure-related skin injuries.
- Prior to insertion, important to contour the rod appropriately. To do this, place a bend along the rod that roughly corresponds to the location of the fracture.
- Insert second nail using steps described above
- Once the second nail is inserted into the canal (from then on) you may need to use gentle twisting/rotation of the nails to get them headed in an appropriate trajectory (e.g., to obtain reduction, avoid cortical breech, etc.) and/or avoid interfering with one another. As you are rotating the two nails to get reduction and to advance the nails, be extremely careful to not get your nails twisted. You need to be very mindful of which direction you are rotating the nails each and every time you make an adjustment. Do NOT simply start rotating them haphazardly! Down the road when these eventually need to come out, having them all twisted up inside the canal makes removal tremendously challenging.
- Tip: Whenever you rotate the nail one way or another (e.g., clockwise or counter-clockwise), remember the direction you rotated and make sure you de-rotate in the opposite direction (e.g., counter-clockwise or clockwise), if needed.
- As above, remember to be mindful of the skin as you insert.
- Once the second nail is inserted into the canal (from then on) you may need to use gentle twisting/rotation of the nails to get them headed in an appropriate trajectory (e.g., to obtain reduction, avoid cortical breech, etc.) and/or avoid interfering with one another. As you are rotating the two nails to get reduction and to advance the nails, be extremely careful to not get your nails twisted. You need to be very mindful of which direction you are rotating the nails each and every time you make an adjustment. Do NOT simply start rotating them haphazardly! Down the road when these eventually need to come out, having them all twisted up inside the canal makes removal tremendously challenging.
- Ensure fracture reduced on biplanar fluoroscopy before crossing fracture with nails
- Cross the fracture and impact the nails into the distal metaphysis
- Ensure you do not breech physis and are well-clear of the physis if planning to compress fracture (which will cause nail to advance further distal)
- Once satisfied with nail positions, gently bend proximal aspects of nails using inserter handle. Does not need to be an aggressive bend. The main purpose of doing this is simply to create a slight gap between the bone and the nail to make nail removal easier down the road.
- Cut rods using large bolt/rod cutter
- Use impactor/tamp to push down any prominent nail head(s)
EVALUATION
- Biplanar fluoroscopy guidelines (recommended by manufacturer)
- Apex of the nail bend should be situated at the fracture level
- The two nails should be aligned face-to-face in the canal
- The two nails cross each other above and below the fracture site
CLOSURE/CONTINGENCY
Reduction and Fixation Contingency
- Contingency for Other Potential Complications
- Closing Checklist
| Topical/local adjuncts (e.g., irrigation, antibiotic beads/powder, hemostatic, anesthetic, etc.) | N/A |
| Drain (and removal criteria) | N/A |
| Closure materials (and technique) | Subcutaneous: 2-0 braided absorbable, deep interrupted Skin: 3-0 monofilament absorbable, simple interrupted |
| Wound care (including dressings/NPWT/VAC, bathing [e.g., dressings on vs. off, timing, etc.], and dressing/NPWT/VAC removal plan) | Adhesive strips, vaseline gauze, cut 4x4s, cast padding |
| Cast/splint/DME (e.g., sling, brace, abduction pillow, boot, etc.) | Short-leg cast |
| EBL | 10 cc |
| Resuscitation (e.g., crystalloid, colloid, blood products, etc.) | Varies |
| Tourniquet time | 75 minutes |
| Postoperative imaging (e.g., PACU) | N/A |
| Postoperative antithrombotics (dose, frequency, duration) | Not indicated due to age |
| Postoperative antibiotics (dose, frequency, duration) | Ancef 25 mg/kg, q8h, two doses |
| Postoperative pain management (mild, moderate, and severe/breakthrough; including acute postoperative management of patients with chronic pain) | Multimodal |
| Diet/nutrition and GI (e.g., glucose management, supplementation, PONV, ileus, etc.) | Advance diet as tolerated |
| Anticipated discharge/disposition plans | Pending pain control and mobilization |
| Other special orders (e.g., Foley, consults for comorbidity management or other issues, labs, pathology, etc.) | N/A |
THERAPY (and follow-up)
- Activity (WBS, ROM, and/or other restrictions/precautions): NWB
- PT/OT: Not routinely
- Follow-up: 2 weeks for wound check
- Plan for removal of hardware ~6 month postoperative in order to mitigate potential issues from hardware in a young child (e.g., stress riser, potential for migration, overgrowth, adds complexity if future surgery to the area required, etc.).
POSTOPERATIVE DEBRIEFS
- Case summary
- Date: Omitted
- PGY: 1
- Attending/Fellow: Omitted
- Patient summary: Omitted
- Procedure and indication: R tibia and fibular ESIN for closed R diaphyseal tibia fracture with associated fibula fracture
- Alternatives considered:
- CPT codes: Omitted
- Imaging:
Preoperative:

Final fluoroscopy:

- Learning points:
- Difficulty with closed reduction, due to some of the comminution. Able to achieve good reduction by applying axial traction using radiolucent triangles and stack of blue OR towels.
- Tibia: 3.5 mm stainless steel ESINs
- Notice distally how the nails cross essentially right at the fracture. This is not ideal, but sometimes there is no way around this.
- Fibula: 1.5 mm titanium ESIN
- Decided to augment our tibial fixation with fixation of the fibula due to there being lateral comminution at the fracture on the tibia. We thought that by adding some stiffness/fixation to the fibula, we could help prevent the tibia from translating laterally and/or falling into valgus.
- We initially tried to send a 2.0-mm K-wire up the fibula, but this was a little bit too stiff and not quite long enough.